It is currently Fri Apr 19, 2024 9:05 am

All times are UTC - 5 hours [ DST ]


Post new topic Reply to topic  [ 9 posts ] 
Author Message
 Post subject: Gauge Needles
PostPosted: Sun May 11, 2014 4:16 pm 

Joined: Sun Jun 17, 2007 8:03 pm
Posts: 1072
Location: Warszawa, Polska
A friend of ours just finished making a new set of needles for all of CNR 6167 gauges.

His name is Al Rutke and he owns a laser cutting shop in Newmarket, Ontario called LaserTek Precision. He normally handles jobs for the local tool and die industry but also has a long history with a company that makes full size cockpit simulators called FlightDeck

http://www.lasertekprecision.com/index.asp

Here are the needles, and photos of 6167 gauge clusters for comparison.


Attachments:
File comment: New Needles made by Al Rutke of LaserTek
needles.JPG
needles.JPG [ 82.55 KiB | Viewed 7113 times ]
File comment: CNR 6167 Engineer's Gauge Cluster
Engineer's side gauges (circa 1980).jpg
Engineer's side gauges (circa 1980).jpg [ 145.45 KiB | Viewed 7113 times ]
File comment: CNR 6167 Fireman's Gauge Cluster
Fireman's side gauges (circa 1980).jpg
Fireman's side gauges (circa 1980).jpg [ 192.82 KiB | Viewed 7113 times ]

_________________
CNR 6167 in Guelph, ON or "How NOT To Restore A Steam Locomotive"
Offline
 Profile  
 
 Post subject: Re: Gauge Needles
PostPosted: Sun May 11, 2014 10:17 pm 

Joined: Fri Mar 03, 2006 1:45 am
Posts: 366
Location: Skagway, Alaska
Fantastic.

_________________
This is the end of my post.


Offline
 Profile  
 
 Post subject: Gauge Needles
PostPosted: Mon May 12, 2014 1:42 am 

Joined: Sun Jun 23, 2013 1:16 pm
Posts: 209
Several years ago, I attended an auction at a long time mining equipment mfg co. that had went out of business. They started out at the turn of the century, I believe.

Anyhow, this place was like a time capsule of machine shop stuff, and their tool room was fantastic. My big problem was I had to leave way before the sale was over in order to go to work.

Anyhow, when they got to the tool room... which I hadn't dug into... they came out with two wooden cases about a foot square in size. Nice, varnished boxes with brass hardware. They opened them up and tried to guess what they were.

I had seen something like it before~ they were Crosby steam gauge testing apparatii ;) ... I got the pair for $40. They were complete with all adapters, weights, gauge needle pullers, oil can... and everything either nickel plated or brass, or japanned.

I sold both those sets on ebay a number of years ago. I have some largish steam gauges from stationary boilers and I played with it, seeing how it worked. It was very ingenious how they worked.

Do you guys have one of these, to test your gauges to make the needles accurate after you reassemble them?


Offline
 Profile  
 
 Post subject: Re: Gauge Needles
PostPosted: Mon May 12, 2014 1:59 am 

Joined: Fri Mar 05, 2010 3:41 am
Posts: 3912
Location: Inwood, W.Va.
Fantastic work!

One of the interesting things in this is the technology (water jet cutting) is, based on another post, adaptable for things as tiny as this, and as large as new connecting rods!


Offline
 Profile  
 
 Post subject: Re: Gauge Needles
PostPosted: Mon May 12, 2014 7:04 am 

Joined: Sun Jun 17, 2007 8:03 pm
Posts: 1072
Location: Warszawa, Polska
We are just cosmetically restoring the gauges. 2 of them are missing all of their guts so making them functional, let alone calibrating them is kind of a moot point now.

_________________
CNR 6167 in Guelph, ON or "How NOT To Restore A Steam Locomotive"


Offline
 Profile  
 
 Post subject: Re: Gauge Needles
PostPosted: Mon May 12, 2014 12:31 pm 

Joined: Wed Jan 15, 2014 9:14 am
Posts: 353
If you did plan on using the gauges, you can transplant the mechanism from a new gauge or newer gauge into the old housing. I have made many duplex air gauges for air ride systems on '73-'87 chevy trucks that way. Fit in the dash and match the factory gauges perfect. I would think you could take the air brake gauges out of a scrapped EMD, GE, etc and use the "guts" as long as the sweep is correct. There is a company in Florida (I think) that makes custom gauges. I was told they can refurbish existing gauges. New "guts", reprint face, calibrate, polish, etc. I can't remember the name of the company though. I will see if I can find their info.


Offline
 Profile  
 
 Post subject: Re: Gauge Needles
PostPosted: Wed May 14, 2014 8:04 pm 

Joined: Sun Dec 30, 2007 1:12 am
Posts: 365
Location: canada
They look fantastic Joe, well done!

_________________
From the footplate,
Project 6069
engine6069@hotmail.com


Offline
 Profile  
 
 Post subject: Re: Gauge Needles
PostPosted: Sat May 17, 2014 3:08 pm 

Joined: Mon Apr 19, 2010 9:31 pm
Posts: 40
Location: Amanda, Ohio
EWrice wrote:
. I would think you could take the air brake gauges out of a scrapped EMD, GE, etc and use the "guts" as long as the sweep is correct.


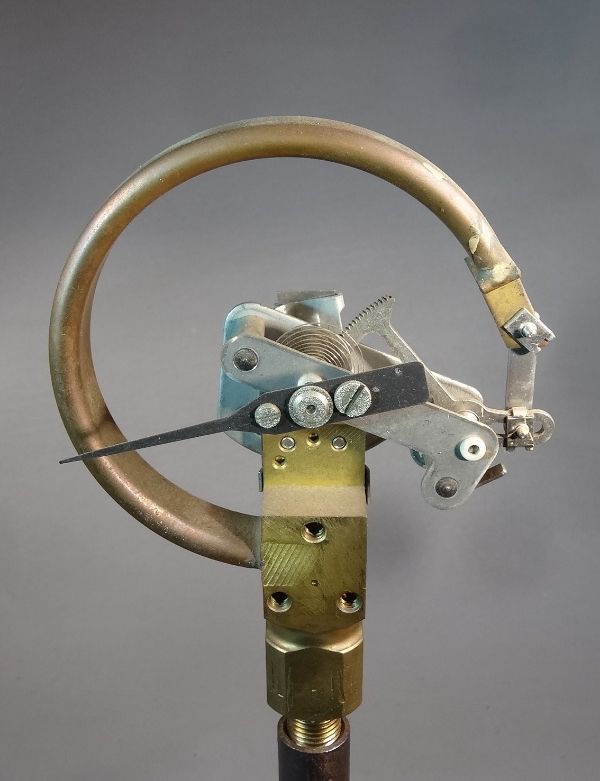
The "sweep" of a gauge can be changed quite easily by simply loosening a screw and moving the lower end of the vertical link shown on the right-hand side of the photo. Some gauge manufacturers refer to this as the "speed adjustment." I have never tried to change the range of a gauge, but have used this adjustment to correct for errors that developed over time.

Bruce E. Babcock

Image


Offline
 Profile  
 
 Post subject: Re: Gauge Needles
PostPosted: Mon May 19, 2014 1:22 am 

Joined: Fri Mar 14, 2014 11:44 pm
Posts: 200
Quote:
The "sweep" of a gauge can be changed quite easily by simply loosening a screw and moving the lower end of the vertical link shown on the right-hand side of the photo. Some gauge manufacturers refer to this as the "speed adjustment." I have never tried to change the range of a gauge, but have used this adjustment to correct for errors that developed over time.


This is known as the "span" adjustment. It is a bad idea to take a gauge mechanism that was intended for a certain pressure and attempt to 'get it to work' by playing with the adjustments. The span adjustment is intended to make up for minor variations in the bourdon tube response either from original manufacturing tolerances or from metal fatique. An adjustment range of maybe +/- 15% is the most you could expect to achieve. Trying to push the gauge beyond that you will get crappy accuracy. Also taking a lower pressure gauge and trying to push it to higher pressure is a disaster which may ultimately cause the bourdon tube to split resulting in leakage of air or live steam.

Transplanting a movement from one gauge to another will also generally not be satisfactory unless the donor and the recipient are of the same manufacturer, size and model. The axis of the needle pinion is not necessarily at the center of the circular gauge body, nor is the dial inscription necessarily centered. Positioning up, down, left and right is used to correct for the inherent non-linearity of the Bourdon tube and mechanism. The mounting of the dials to the mechanism (if applicable -- some dials are mounted to the case) and the mounting of the mechanism to the case, etc. also vary from manufacturer to manufacturer.

Fortunately there were not that many actual gauge makers over the years. Your gauge may say Westinghouse, New York Air Brake, General Electric, etc. but that is just a label. The gauge was made by Ashton, Ashcroft, Beacon, Star Brass, Crosby,
etc.

If one is in any way concerned with the gauge as an accurate, reliable indicator of steam or air pressure, one should be periodically testing and calibrating them, or sending them out to a shop which does this work. Remember that most RR gauges were not made to ASME specs so terms like "B grade" or "2A" grade are not applicable. Most gauges were made to be most accurate in the sweet spot zone. E.g. a brake pipe gauge in a 70# system would do best in the 40-90 psi range. Much below or above that range, the accuracy can be pretty far off and it doesn't matter that much.

If you ever have reason to remove the needle, e.g. for cleaning or painting, do NOT re-installed the needle for 0 with the gauge de-pressurized. This is the least sensitive zone and there is in fact typically a 5 psi dead zone or "take-up" to make sure the needle stays seated on the pin when the pressure is 0. It is best to establish a reference pressure, e.g. 70 psi, and then pin the needle on the spindle to read that exact reading. Tap the gauge lightly before setting the needle. It is important to Invest $50 in a gauge needle puller/setter -- don't pull the needle off with screwdrivers, pliers, etc. The gauge can be tested by piping it in parallel with a known calibrated gauge, e.g. a test gauge of at least 2A accuracy with a similar pressure range to the one you are testing. Check it at the low, middle and high numbers of the sweet spot range by applying a reference pressure and comparing the test gauge to the gauge in question. Dead weight testers are plentiful on the used market but require some skill and training to use correctly. The comparison method is much easier and quicker.


Offline
 Profile  
 
Display posts from previous:  Sort by  
Post new topic Reply to topic  [ 9 posts ] 

All times are UTC - 5 hours [ DST ]


 Who is online

Users browsing this forum: Google [Bot] and 203 guests


You cannot post new topics in this forum
You cannot reply to topics in this forum
You cannot edit your posts in this forum
You cannot delete your posts in this forum
You cannot post attachments in this forum

Search for:
Jump to:  
 
cron