A good story should be told to a conclusion. My
article last year detailing efforts to that
time to rebuild ex-B&M 1246, a 1907 Pullman coach, left the reader hanging in
mid-project. Nothing looms gloomier than an unfinished project, and last year’s
reader might wonder whether any more work went on, or whether I was satisfied to call it a
day. The answer is easy enough: 1999 saw a lot of work, although most of it was interior
and thus not observable to the passers-by.
Last winter, when I wrote the last chapter, I had just received the builder’s photos
of Pullman lot 3512 from the Smithsonian. At the same time, I had requested the Illinois Railway Museum, keeper of the Pullman archives, to
see if they had any documentation from that lot. My letter received no reply and over the
course of the summer, I forgot about it.
Winter hinders work in a wooden coach with plywooded windows something fierce. I have
experimented with both gas and electric heat and prefer electric for most purposes. A
railroad coach is notoriously hard to heat because of its long, narrow and high interior.
If you have been in a coach heated by a stove in one end, then you understand. Sit next to
the stove and you roast, anywhere else and you freeze. Add to this the fact that heat
rises up into the clerestory and you can see the problem (unless you want to work in the
clerestory, and then you roast). On the very coldest days, there is no other way to go
than to just fire up the gas heater and go ahead. On days that are not so cold, a radiant
electric heater that can focus the heat on the area you’re working on does better.
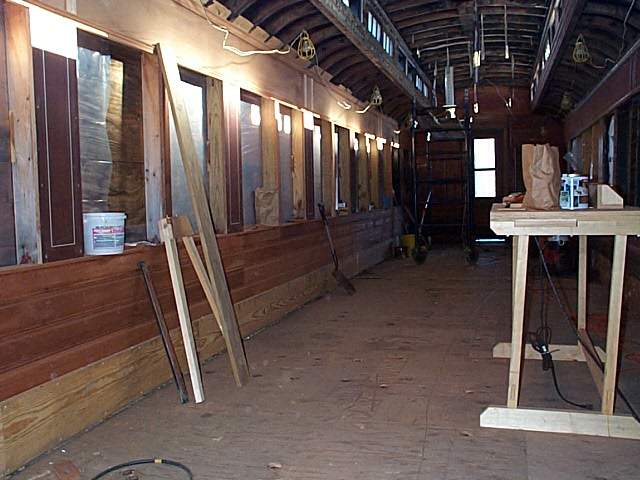
Last winter was a good time to begin stripping the paint from the upper deck area around
the clerestory windows. By placing an interior scaffold on wheels under the area to be
stripped, I could climb up with my heat gun and putty knives and go to work. A heat gun
works very nicely on thick paint. Mine has two speeds and I use the lower. There is no
danger of fire as with propane. The work is slow and an ugly film of paint and old varnish
remains to be cleaned off later. I could do a pair of windows in an afternoon. There are
nineteen windows on a side. The job is slower when there are moldings and there are
moldings above and below the windows. Like most jobs on the car, it seemed an endless
series of little, fussy steps. At the end of the winter, the paint was off, but there was
a smeary mess just waiting for round two.
 |
|
Round two had to wait for a while, since it was now warm enough to work without gloves and there was a bit of fancy routing to do. The area below the windows was horizontally sheathed in mahogany boards. Not only were they tongue and groove, but with a flute and a small groove on each edge. I had done about half the job the previous fall, but now the rest had to come next. It is no great trick to do tongue and groove. There are router bits made just for this application. The trick is to deal with twelve foot boards, the correct length to span four windows. Rarely are the boards in this length completely flat or with a completely straight edge. I had to build extensions for my router table to handle the extra length and use a feather board to assure that the work wouldn’t rise as I was pushing it through. The tongue and groove part was successful, but trouble lay ahead with the flute and groove. No company made a bit that would do both in one pass. Each pass exposes the work to error. The slightest wiggle or flinch reveals itself in the final product. The tongue or groove was one pass. The flute the next and the groove a third. Three chances to screw up instead of one. Add to this that on a router table for the flute and groove the work would have to be on edge, not flat. The originals were undoubtedly made either with a molding plane or a mechanical cutter of some kind where the work was firmly clamped so there would be no chance to move and the work could be done in one pass. All I had was a medium powered router and a home made table with extensions. Working slowly and with two featherboards, I was able to produce enough of the wainscoting to finish the side.
 |
|
The obvious question was why didn’t I go to a molding shop and have them cut me the
correct profile? The just as obvious answer is cost. No molding shop carries the exact
profile that I wanted, not even as correct as what I could cobble together from several
different router bits. The saw sharpening outfit that I deal with would make me a set of
knives, but only for a shaper, not a router and at a high price. I would have to find a
molding shop that would agree to take my knives, set up a machine and run a very limited
amount of stock at a high price. I felt that as long as I could do a passable job myself,
that I should do it. The results were passable, but not exceptional.
Next I had to finish up the mahogany boards above the windows. They were unusually wide
and not easy to buy at my hardwood supplier. Nor, once tongued and grooved, were they easy
to hang single handedly. Each one was about twelve feet long, with the exception of one at
fourteen feet. Add to this the fact that they had to form a straight line visually as you
squinted down the car and you can see that it wasn’t a simple task. Once they were in
place, there was a molding that ran the length of the car along the bottom edge of the
boards and another that ran along the top edge at the roofline. They are visible in the
builder’s photo in the first article. These moldings were fussy to clean on the good
side and even harder to replicate on the bad. I was able to produce a good set of the
lower moldings using my table saw and two passes with the router as long as I didn’t
try to do too much all at once. Between the saw and the router, it took five passes for a
piece that measures only 1 1/4" x 1 1/2 ".
 |
|
Before tackling the upper molding, I took a break by doing the window sills on one side.
These are continuous pieces that run the length of the car forming window sills where
there are windows and a thin trim over the piers. The thickness is only 1/2". You
can’t buy stock that thin so you have to buy it 3/4" and have it planed
essentially wasting a third of the material and paying for the planing too. This leaves
the work fragile especially where it is cut out to go around the pier. It is a nice
juggling act to get it into place without breaking it. When you break mahogany, you fix it
as best you can.
 |
|
After doing the window sills, it was time to do the panels covering the piers. Piers are
the uprights that in a house would be called studs. The piers in this car alternate
between narrow (2 1/2") and wide (10") with even wider piers at each end. The
narrow piers were covered with a simple mahogany board, but the wide ones had an inlaid
plywood veneer. Fortunately the inlay is a simple black and white band outlining the
panel. I had never worked with inlay before, but it wasn’t hard to see how it went
together. Just glue a piece of 1/8" white wood to a piece of 1/16" black and
slice thinly. For the white, I chose maple, but holly might be preferred, and for the
black, I chose what the catalogue called "ebonized" wood. I joined them with a
contact cement and it worked well. I was able to get thin slices with my table saw with a
fine toothed blade.
 |
|
I had never done veneer either. I thought of veneered plywood, but chose instead medium
density fibreboard (MDF) and paper backed veneer. It went together well. It was then time
to mate the veneer to the inlay. After cutting the veneered MDF to the correct size for
the particular pier, I cut a 3/16" groove with my router for the inlay and set them
in with contact cement with mitered corners. It worked fine, but I won’t know for
sure until the veneer has gone through a season of cold and damp without delaminating.
While dry, the interior is unheated and subject to swings in temperature and humidity
which will test the veneer, MDF and cement. The next step will be to test on a sample just
how much sanding the veneer can take. Heavy sanding will go right through the veneer, but
without any preparation, the surface isn’t ready for finish. Another question is that
of staining and filling. The builder’s photo, albeit black and white, shows a rather
dark finish, but a close look at what is under the paint makes me suspect that the finish
was the natural tone of the mahogany darkened with age and varnish. Mahogany is an open
grained wood, like oak or ash, so to get a smooth finish, it is necessary to apply a
filler either with or without stain. This filler is not the kind used to repair damaged
wood but rather a product usually used on floors which will receive a high gloss finish.
It is an old fashioned item that most sellers outside of a specialty paint shop
wouldn’t carry. It isn’t clear whether the interior received this treatment or
not. I will have to work on samples to see how to best reproduce what appears under the
paint. Unfortunately, what appears when the paint is stripped is lighter than the original
varnished finish so some guess work and compromise will be in order.
|
New veneered panel with inlay.
|

Toward the end of the season, the replacement of the upper molding came to the top of the
list. It is like a crown molding in that it is the transition from the vertical of the
side to the curve of the roof. It forms the surface against which the lower edge of the
curved ceiling panels rest so that it’s backside forms an approximately forty-five
degree angle and the front side is a complex of coves, grooves and a large ogee. Since I
had had acceptable results before, I tried a mock up in poplar with the table saw and
router. The results were not encouraging, but were not so far out of line that I was ready
to give up. This molding being bigger than the others and calling for more passes was very
hard to keep under control. I actually made some out of mahogany, but finally realized
that I never would be satisfied with the results. Fortunately I can cut the duds down and
reuse them, so they won’t be a total waste.
 |
|
There was just no other answer than to go to the saw center with a sample and have them
make the cutters. They were able to do this with out any problem and they were able to
recommend a local shop which might consider running a small (for them) amount of it. I
contacted the shop and they did reluctantly agree if I bought the stock and paid a set-up
fee as well as paid per linear foot. It was expensive, but worth it because it came out
perfect, making my earlier efforts with the wainscoting and lower molding look a little
pale by comparison. It went up nicely and looks good.
As of the end of the year, I’m at the point where I can identify the remaining
projects. They are: to build the two saloons with complex curved opaque glass ceilings; to
construct forty two-piece windows with glazing and paint; to construct twenty clerestory
windows with ditto; to install them with the exterior ash and interior mahogany stops and
to lay the finished floor and then to finish the entire interior.
 |
|
The biggest challenge will be the
saloons because the originals were totally ripped out so there is no evidence to go by now
as to their construction. Again luck has stepped in in the form of ex-B&M 1244 an
identical car from the same lot preserved by the National Park Service in Lowell, Mass.
That car was made into a wreck tender in 1946 and is well restored in that configuration
to-day. Both saloons are still in it. (Men’s and Women’s are not identical.
Men’s had a space for wreck tools and the women’s carried the water cooler.)
Personnel at the park have been very cooperative in giving me access for photos and
measurements. I thank them.
At the very end of the season, I received an order form from the Illinois Railway Museum
indicating that they had the specifications for lot 3512 and some drawings. I ordered and
received the specifications and was gratified to find that based on the specs, I
hadn’t made any serious errors in the rebuild. The car itself gave enough clues that
an observant person really didn’t need the specifications, but it was fun to have and
to check against. I will probably take all winter finishing up the paint stripping along
the upper deck and will tackle the rest in when the weather warms up. When the final paint
stripping is done, there is always the task of stripping glass and hardware from the
rotted and broken window frames that came with the car.
People are always asking when I plan to finish and what I plan to do with it. My best
guess about completion is two more years at the present pace. As far as what I plan for
the car, I’m sure someone will come along who will want it on terms I can live with.
I don’t plan to keep it as a 1.) diner, 2.) spa, 3.) bowling alley or 4.) cathouse
(all suggestions). I do have to have a party in it when all is said and done. I’ll
let you know.