return to
articles index
Boston & Maine Pullman Car No. 1246
Update
text & photos by David Woodbury
|
|
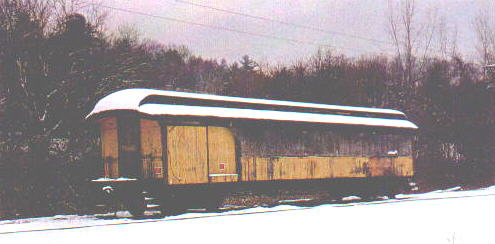
| 9 years ago No. 1246, then lettered Monadnock,
Steamtown & Northern No. 243, was a rotting derelict, one of the last cars remaining at the old Steamtown site in Vermont, seemingly unwanted by anyone and a prime candidate for scrapping. |
Winter in New England is a time for stock taking rather than record breaking.
There is little else to do on an essentially outdoor project, even when the temperature rises close to thaw.
I have limited ability to warm the inside work area after
almost nine years, but at least now I have the luxury of being able to enclose the space.
In a way, the space is too closed since the windows are
boarded up with plywood and the only natural light comes in through the clerestory windows and the door lights.
When the snow blocks the clerestory, the light is dim indeed.
|
|
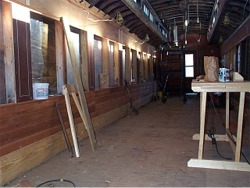
| An exterior view of No. 1246 today, showing the staging set up in preparation for window installation when the weather warms up. |
Until I
replaced the ceiling of the car this past fall, I had a string of construction lights that gave good light supplemented by work lights, but I didn't want to fasten them to the new ceiling, so I had to turn to shop
fluorescent lighting which would light up only the immediate area. Heat, such as it is, is by an electric heater which works surprisingly well.
My table saw, jointer and band saw are in the adjacent barn, heating of which is totally impossible.
All this means that for the time being, my work is confined to my basement.
Specifically for this winter, this means finishing, glazing and painting 16 of the 20 clerestory windows I need to replicate.
This leaves a total of 84 other windows for the warmer weather.
Spring 2000 found me wondering how best to replicate the two missing bathrooms or
"saloons," so-called in the Pullman specs. Either the B&M in 1950 or Steamtown in 1959 had ripped the originals out, not very artistically.
The raw wounds had at some period been patched with a semi-soft material, perhaps glazing compound and painted.
None of this was very apparent until I stripped off the many layers of paint to reveal the original mahogany.
When I stripped out the broken bits remaining of the walls, I was able to establish the original dimension and the original curvature of the saloon ceiling, essentially a frosted glass window.
There were never any lights in the saloon itself, so interior lighting had to spill over from the lights of the car interior.
The Pullman builder's photos showed one end of one saloon only so were not too helpful.
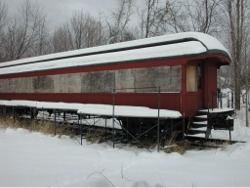
Where I ran into great good luck was in sister car 1244 now on display at the Lowell, (Mass) National Historic Park in it's 1946 identity as a wreck tender behind ex-B&M 410, a well restored 0-6-0.
Maintenance Supervisor Dan Hyde was kind enough to let me inside to photograph and measure the saloons in 1244, both of which survive.
This prepared me for my own replication project which began with making a pattern for the ceiling curvature. This curve had to fit into the mahogany panels on each end wall, so I was not free to establish my own radius. In fact the curve was close to, but not exactly, a constant radius. This meant a lot of try and fit before I got the pattern right. Luckily the curve was the same on both ends of the car. Once I had the curve right, I had to make a "window" with curved sash in one plane and flat in the other. The glass would be flat
fortunately.
|
|
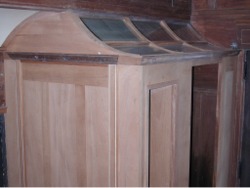
| Ceiling of the women's saloon with glass in place, but not yet frosted. |
To make the curved sash from one piece of mahogany would have created an almost criminal waste of a valuable resource, so a solution was to laminate some scrap and that worked out well once I established which plane the lamination should follow for maximum
strength (vertical, not horizontal). The walls were mortised and tenoned out of 5/4 mahogany with inlaid veneered panels. The inlay was a rather simple black and white made from maple and "ebonized wood" laminated and sawn into thin strips. The doors and trim will have to wait for the finished floor before their final size is apparent. Each panel has its own trim between it and the stile or rail it sets into and each saloon has molding above the door, both inside and outside. To top it off, each end wall on the outside (outside the saloon, but inside the car) carries a beveled glass mirror so a frame for each had to be made. At one point I tried to count how many individual pieces went into each saloon, but I gave up after about 150.
It should be no wonder that this effort took a good portion of the summer, longer than I estimated by
far.
|
|
|
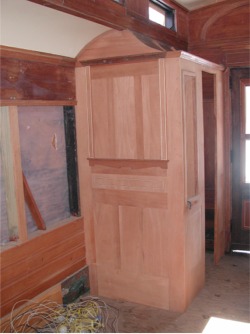
Completed women's end saloon. Note pocket on
saloon front to hold water canister. Men's end has a small cabinet
for wreck tools on the inside of the door. |
It was into early autumn when I could turn my attention to the next big area of work for the year, the ceilings. The original material was simply stated to be "composition board" and it appeared to be a heavy paper or cardboard, not corrugated. None of it was salvageable due to water damage. It's replacement had to be flexible enough to take the curve especially on the lower roof over the seats and rigid enough not to sag on the longer runs of the monitor roof over the center of the car.
The material that best fitted this requirement is hardboard. Masonite is one of it's trade names. Hardboard comes in two styles, tempered and untempered. Untempered is more flexible, has a less finished appearance and is harder to find. Tempered won't take the more severe curve of the lower roof, so I shopped around for the untempered. I used 1/8 inch for flexibility, but might have been better off with 1/4 because of the greater ease of countersinking and hiding the fastening screws. For those seams that wouldn't be covered by the original style strips or battens, I used a flexible caulk. Commercial joint compound might have offered a smoother finish, but I was suspicious that it wouldn't be as flexible. Thanks to Linn Moedinger for the suggestion. Priming and painting with a paint that followed the original came next and represented the first finish work on the
project.
|
|
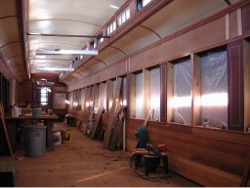 |
| The interior of No. 1246 last year, before replacement
of the ceiling. |
Interior view showing ceiling and overhangs, installed
this past fall. |
By this time, fall was fast closing in and it was time to approach the task which I wasn't looking forward to, making windows. The windows in the car when I got it were in very poor shape. I took them out and set them aside not really having any plan for them at the time. Many had begun to rot at the lower edge and were coming apart. Others were just weathered and loose. These windows were not the right style for the car, being a single large pane. My windows had to be in two parts, a fixed light above with a 25"x 8" pane and a raisable light below with a 25" x 25" pane.
I began by salvaging the glass out of the windows and found that I could get all the glass needed for the smaller panes by cutting the salvage glass. The frames, I set aside again. The only trouble was that I had very limited and discouraging experience cutting glass. Fortunately I ran into a friend who is one of those people who can do about anything and he offered to teach me to cut glass. This he did in the course of one morning.
There are just a few things you need to keep in mind. First, there is a difference between old glass and new. Glass that has had exposure to the sun and weather is more brittle and harder to cut than new. My glass was certainly "old". Secondly, the glass must be clean. Dirt will hinder a nice clean score from the cutter. Take the time to clean the glass thoroughly. Thirdly, avoid the cheap five dollar cutters you can find at your local hardware store and go instead to a glass professional and order what they use all day long. It will be self-lubricating and cost eight or ten times the amount of the cheap ones. Considering the cost of glass, it's a good bargain. Fourthly, when you cut, take only one stroke in one direction. Avoid repeats. Fifthly, when you are ready to snap, take the piece with thumb and forefinger of each hand on each side of the score at an edge and roll your hands away from one another smartly. Practice first with some junk glass. I was a complete beginner, but I ruined only one piece of the 3/16 glass and easily salvaged what I needed from what I had.
The last project before winter was the replication and glazing of 20 clerestory windows. During it's service life, the B&M removed 20 of the clerestory windows and boarded them over. The remaining 18 received many layers of paint over the years. Early on in the work, I removed the 18 and stripped the paint. Each pane was broken by vandals at some time, but enough of the glass remained so that I could see what it was. It was not frosted in the usual way, but was semi-opaque with a very interesting feathery pattern. I took a piece to my local glass retailer and found that it was called "double process chip" and was made by stripping off a layer of glue applied to the glass and in the process, stripping off some of the surface. I was able to buy what I needed precut for the entire job.
I repaired the original windows then and there and made a set of replacement windows out of poplar, but I wasn't satisfied with them from the beginning and never installed them or the glass. They're still in my basement. I needed to make new proper clerestory windows as the first step in the window making process. The thickness of the window stock is 7/8", an uncommon dimension for finished hardwood. I had to buy rough sawn 4/4 stock and plane it down to 7/8" which worked out well. Next, the people who make router bits think that you will work in wood that is 3/4" thick. You have to take that into consideration when working with other
thicknesses. The windows have to be as much alike and as square as possible so I had to make a jig out of MDF and scrap wood. I wanted to use the old windows as much as possible for materials, but found that there was no way to get the longer dimension from them and also there was always the danger of old nails waiting for your blades and bits, so I decided to use them mainly for the quarter rounds to hold in the panes.
The windows I learned from looking at the numbers on each must have come from some steel Rutland coaches made by Pullman about 1914. They long survived the coaches, but how and why they wound up with me, I don't know. The 16 new windows came out OK and are now getting varnished, glazed and painted. I ran out of material for the final four, so they'll be the first out of the box in the spring.
David Woodbury is a 57 year old lawyer living in New Boston, New
Hampshire. He cut his teeth, so to speak, as a Mount Washington Cog Railroad engineer
in the sixties and has been hooked on railroading ever since. In
addition to working on 1246 for the past nine years, and estimating another two to complete the
project, he is also Project Manager for the 494 Restoration Committee, which
is cosmetically restoring the ex-B&M locomotive in White River
Junction, Vermont.
return to articles index


