|
|
The Continuing Saga of ex-Boston & Maine Coach No. 1246 (Part V) |
|
by David Woodbury |
Before going any further, go to your bookshelf, library or even the internet and read Oliver Wendell Holmes's The Deacon's Masterpiece. It's the 1850s poem about the deacon who tried to apply logic in building a chaise that wouldn't wear out. (The deacon was successful, in a sense.) Only then, will you have a true appreciation of what a wooden car re-builder, especially a first timer, self taught, faces after eleven years of labor. I'm not complaining, mind you. Actually I've had a lot of fun doing something I never thought I could and now that I can see the end in sight, I need to figure out what to do with all this work so that it stays together.
The work year here is only seven months long, the other five are too cold to do much except what I can take into my basement. Even there, I have trouble with things that are too smelly and/or flammable. I could stretch the year somewhat when I was stripping paint because some February and March days had enough afternoon sun to give just enough heat to allow work with gloves and an insulated suit, but the work has moved on and the tasks at hand demand glovelessness. Heating the car is possible, but neither with an electric or gas heater can you get the level of comfort you need to work with glue of varnish.
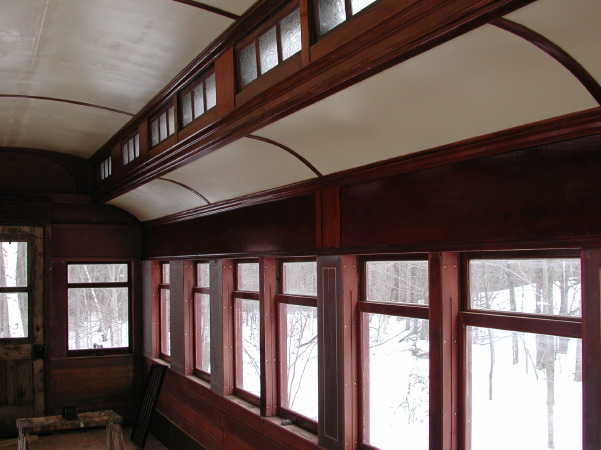
In the fall of 2001, I had managed to install windows on the west or sunny side of the car which, for the first time, gave the appearance of a finished product on the outside. That is, if you ignored the fact that you couldn't see through the windows from one side to the other. The temporary plywood still remained in place on the east or shady side.
In April, I moved the staging from west to east and began taking down the plywood and installing the windows I had made up earlier and set aside. There are a lot of pieces and processes that go into installing a window. On "This Old House," Tom and Norm, just pound in few nails and caulk them up. Not so for me. There's a three piece frame that keeps the two part window from falling out and two pieces inside that keep them from falling in. In addition, there is the sheathing between the windows that has to be milled, caulked, nailed and painted. This has to be done twenty times on each side. Remember that each installation is for two windows, upper and lower. It wouldn't be an exaggeration to say that this exercise took about a month. (I admit to not working an eight hour day.)
It was during this exercise that I began to notice suspicious activity in the car. For a while, squirrels had been living in the spaces under the roof. I know how destructive they can be and was waiting for any sign of damage, but never found any. I've had fairly good luck with animals in the past, particularly porcupines which live in my barn. They've never hurt my tools or the car even though they walk under it as a path to the woods. Once in a while, one of them will sit up in the barn rafters and watch me as I work. The critters I'm talking about now are carpenter ants.
I've always known that the potential for carpenter ants was high and in fact had seen a few during work on the frame and floor. These ants are the mirror image of termites in that termites eat wood for food and live in the ground. Carpenter ants hollow out nests in wood, but don't eat it. They're becoming a major pest in the northeast and exterminators know how to control them. When I removed a few inlaid panels between the windows, I noticed that there was a quantity of sawdust behind the panel where there should have been none.
The original plate lay just above the area and it had been subject of some superficial rot due to a roof leak years ago. Even though southern yellow pine is hard and quite insect resistant, it can let insects get a toehold if it starts to soften up. This coupled with the fact that for a while, an overhanging branch brushed the car roof, must have allowed the ants to get a start. In any case, I could find no damage in any place I could inspect visually. Also, I could find a few, but not many, ants crawling about in the open. There was no help for it though and the exterminator had to come. I had to show him how the car was constructed since he had never seen one before and turned him loose with his poison. He assured me afterward that there were indeed ants in the area involved and that they had not yet established themselves firmly. I hoped he was right.
Later on in the year, I turned over a few pieces of plywood lying on the ground beside the car and found them crawling with ants. I promptly got rid of them, but the ants live in the area and are just a fact of life. It's hard to imagine them trekking laboriously up and down the wheels, axles, trucks frames and up the car just to nest in the roof, especially when dinner is outside, but I guess that's just ant life. I still haven't found any areas of obvious damage.
The next project was to build the two saloon doors. I had replicated the saloons, otherwise known as toilets, a couple of years ago, but had left the doors for later. Now was later. The doors were a lot like the walls in that they consisted of stiles and rails with panels inlaid on the outside. It was a time consuming task since it all had to be done from scratch, but the job of hanging the doors, which I thought would be hard to do right, wasn't so bad. For that I was relieved. It was during this time that I became aware of another environmental fact. I was acutely aware of how cold it can be in winter trying to work, but now, just the opposite held sway. With the windows in and the car with no real ventilation, the temperature inside soared on sunny days.
Why not just open the windows you say? The windows are made and set as the originals were so they can open, but another weather related issue is at work. The windows are sensitive to leaks especially in a driving rain. This means that if they are loose enough in the frames to slide up and down easily, they allow water to enter the joint between the post and sill and no matter how you try to caulk, moisture gets into the wall area and settles there. The tighter you make the window in the frame, the less of this problem you have so I opted for windows that will technically open, but which I would rather let the paint and caulk seal up. Opening up the two end doors doesn't do much for you in the middle, so the season for interior work is now limited to spring and fall. If only the good fairy would erect a nice inside place for me.
In spite of those obstacles, the doors got hung and I turned my attention to some nice outside work until the weather cooled off. This is where I met some smaller life forms that will no doubt bedevil me in future years; fungi. I noticed in installing the windows on the shady side that there was an area of rot starting in the tack strip to which the lower edge of the roof material was nailed. This piece was ten years old as was the letter board and made, like the original, of yellow poplar. Yellow poplar is really a magnolia. It's a huge tree and thus you can get long runs of very clear wood. It mills well and paints well. It isn't a very durable wood, nor is it very stable. It's hard and tough to nail to and nailing the roof to it was a real chore.
Ten years doesn't seem like a very long life for the parts of a wooden coach, but if used as intended, the car would have been exposed to a variety of conditions and each side of the car would have a chance to dry out better than a car sitting still. The equivalent pieces on the sunny side are in good condition. Static display is just a fact of life and the shady side is just going to take more work. There's just no substitute for covered storage.
When I installed the rubber roof, I applied a layer of 1/4 inch plywood as an under layment. This worked out well and formed a good platform for the membrane, but resisted being formed over the curve of the roof until jacked into place. This left me wondering whether when I released the screws along the lower edge, the plywood would spring up thus giving me an Excedrin headache to get it back. There was no way around it though. The nails holding the membrane to the tack strip would have to be pulled and the screws holding the lower edge of the plywood would have to come out before I could remove the rotted section of strip.
The strip was about twelve feet long so there were a lot of nails to pull and screws to back out. Sometimes though, things work for you instead of the other way. The plywood hardly moved at all. It had taken on the shape of the roof over the years. There were some areas of rot beginning on the letter board under the tack strip and this gave me the incentive to try a type of product I had seen advertised for years; the two part epoxy system wood restorer. The product I chose had a thin, paint-on first coat and a bondo-like second application. The wood restored went on well and hardened up commendably. I reapplied a new tack strip and pulled and nailed down the roof membrane. As with all such, we'll see.
As the weather cooled off, it became time to think about varnishing. I decided to go with "real" varnish rather than polyurethane even though it would dry more slowly and might be harder to apply. A few years ago, I put up a board half polyurethaned and half spar varnished and let the elements go to work on it. There was degradation on both halves with neither side being clearly better than the other. For the inside of the car, weather wouldn't be a problem, but I thought that being true to the original in this case made sense and acted accordingly. The varnish I chose was an interior varnish, not spar, and it worked well. The process over mahogany is slow. A dressing with paste filler and the attendant clean up followed by a thinned down coat of varnish and two full coats rubbed out with rottenstone makes for a lot of time spent on a small area. I was able to do the upper deck, as Pullman calls the clerestory window area, but that was about all before the early cold weather put a stop to those activities.
|
|
| You can begin to see the luster of the mahogany come out as the varnish is applied. Contrast the unvarnished wood. David Woodbury photo. |
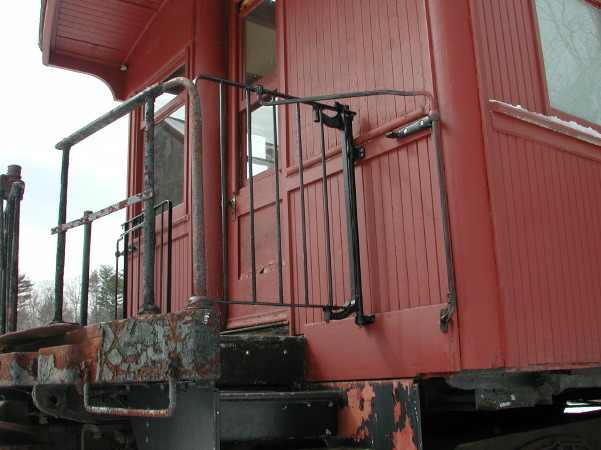
The weather wasn't so cold as to preclude all work so I turned my attention to the Woods Safety Gates that had lain unattended in my barn and basement for years. These gates both swing and fold so as to block the steps from the platform and thereby make crossing between cars safer. This cannot have been easy under the best of conditions considering the complete lack of an enclosing vestibule. Passengers would have had to walk directly on the buffers with only light chains protecting them from falling between the cars. The safety gates wouldn't have prevented that kind of accident, but would have (maybe) prevented falling down the steps. The gates are actually fairly low and an adult would stand a good chance of going right over the top.
When I got the car, it came with 2 1/2 sets of these gates. Luckily, there was at least one of each piece so I didn't have to wonder what some of them looked like. I was fortunate in finding a pattern maker who replacement castings made for me, but I had to make the fourth actual gate and the hand grips out of available flat and round stock. By the time the weather really closed in, I had three of the four gates installed.
|
|
| The Woods Safety Gate may have been state of the art a century ago. Looks like plenty of room to topple over or slip under. David Woodbury photo. |
Winters here normally have a full share of storms with heavy rain and driving wind. This year may be an exception with more dry snow in the mix. As I mentioned above, the newly installed windows in place of the former sheets of plywood exposes more seams to the weather and thus increases the chances of water leakage. This is most a problem with a typical northeast storm blasting rain directly at the side that's already shady and prone to moisture. Of course, one way to combat this is to cocoon the car each winter, but that has it's own set of problems. There's the expense of the materials, the difficulty in applying them and the chance of trapping moisture behind the barrier.
I wanted to try a compromise that would be workable, affordable and at least reasonably effective. I've seen enclosures that cover a car and lace up at the corners. The ones I've seen are made of the cheap blue tarp stuff that isn't made to last. The shape of the car especially at the corners isn't such as to allow a tight and secure fit there no matter what the tailoring. The wind would play havoc with the material shredding it and possibly damaging the car underneath. The more permanent applications are just that, permanent. Swathing the car in multiple layers of high quality material would just not be worth it for what I wanted to do.
When you think about it, the really vulnerable area on a car is the window, particularly the window sill. Rain and snow hit there and stay long enough to penetrate, so if you protect the windows, you protect most of the car. The clerestory is better protected and doesn't seem to cause as much concern. The ends of the car, since they're protected by the overhang of the hood need virtually no protection. How best to cover the windows? I took the problem to a local canvas and awning dealer and we devised a scheme that will probably fill the bill. A sheet of material sixty feet long by five wide will cover the windows and sills. Suspended from an unobtrusive track just under the tack strip for the roof membrane and with grommets at the lower end for tying down either to the frame of to the opposite side curtain under the car the general effect should be to keep the windows dry, but still allow a bit of air circulation for the winter. Unfortunately, the snow came so early that I didn't have time to install the curtains so that for this winter at least, the experiment will have to wait.
The winter has not stopped all work however. There are some parts that are removable to my basement for varnishing. These include the saloon doors and the inner window stops. The issue there is the smell of the varnish causing comments at home. Just have to do the work at times when the smell dissipates before anyone comes home. Another problem with the varnish which I haven't completely solved is that it has a very short shelf life once the can is opened. In an ideal world, I would work from very small cans and completely use one up before going to the next. Of course this is a very expensive way to buy any product. I found that most of the places selling the varnish I use, offer it in quart sizes. After the initial use, I found that no matter how well I resealed the can, I got a thick skin on the surface and the remainder would quickly thicken almost to a jelly. The reducer recommended by the company didn't resolve the issue.
After searching around for a gallon size and having even worse luck, although the price per unit went down, I went to a new scheme. I went to the hardware store and bought some half pint sealed jelly jars and transferred the varnish into them. This seems to be working out well enough and will work better when I start to use more at one time. This is not a problem I've had with paint which seems to last longer once opened. I'm still scratching my head over this one.
On a final note, there was a distinctly bright spot in an otherwise bleak, cold and snowy winter. Like most passenger cars that entered MOW service (thus accounting for their survival) mine was well stripped before even going to Steamtown. Not only were the seats long gone, the buffers stripped off and the saloons removed by sledgehammer, it seems, but the hoppers were thrown out too. I never expected to be able to find any replacements for these homely items and knew that to try and replicate would be totally unrealistic. After all, I didn't even know what they looked like although there was one boarded over hole in the floor so I knew the size of the opening and it's location.
On the other hand, I knew from working on antique cars that there is always somewhere the thing that you want if you can just locate it. As luck would have it, I chanced upon a post on RyPN's Interchange placed by Nelson Saxe of Scotrun, Pennsylvania. He announced that he had come into possession of one of the boxcars de-accessioned by Steamtown and that it was full of stuff he didn't want and was anyone interested.
I knew from the amount and kind of stuff that had been in my car, that Steamtown had squirreled away things that they might have wanted in the future and so responded. A few others did as well, but not as many as might have. His description of what he thought he had was mildly encouraging and I suggested pictures which he eventually sent after making up a compact disc. On reviewing the pictures, I realized that he had a number of dry hoppers, which he at first thought were sink stands until he turned one over and saw the toilet seat. Since these were undoubtedly of B&M origin and, being totally flushless, of a much earlier era that the usual heavyweight equipment, I knew to to virtual certainty that these had come out of the fleet of B&M wooden coaches bought by Nelson Blount in the late fifties.
|
|
| A pot of gold at the end of the rainbow? Maybe not, but a pot just the same. The yellow sticks were placed to show scale. Nelson Saxe photo. |
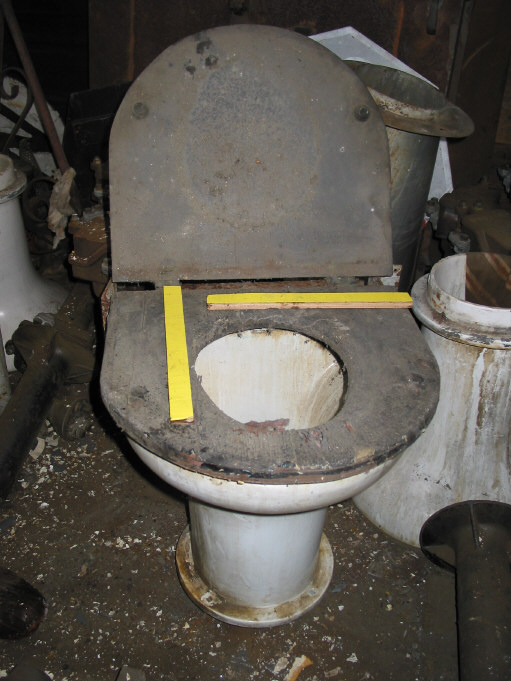
There's nothing like a winter road trip to lift the spirits so off I went to eastern Pennsylvania, bought the toilets and came home, all in two days. In a kind of baker's dozen type of a deal, I got four and had a metal one thrown in free. The Illinois Railway Museum has expressed an interest in the remaining two china hoppers for their B&M diner, but the metal hopper (caboose style?) is looking for a home.
If I had a website, maybe it would have a section for FAQs. The first one would be, "What are you going to do with it when you're done?" I don't want to keep it. I want it preserved and improved upon. Do any of you have any good answers?