It is currently Fri Aug 21, 2026 6:06 pm

All times are UTC - 5 hours [ DST ]


Post new topic Reply to topic  [ 27 posts ]  Go to page Previous  1, 2
Author Message
 Post subject: Re: "Fake" Rivets on Steam Locomotive Tenders
PostPosted: Mon Feb 24, 2020 5:36 pm 

Joined: Thu Aug 30, 2007 5:51 pm
Posts: 97
Location: Connecticut
Howard,

I have not seen the CTM Climax since it left for West Virgina except in pictures and videos. From what I can see the glued on rivets are still in place in all the visible areas as it does not look like the tender has been repainted or re lettered in any way. So I would have to assume the vast majority of them have help up quite well for many years given how much older and grey I am now and how much younger I was when we did the tender.

If I were doing this project again, I would use a combination of approaches. Where ever the rivets were not likely to see any type of impact I would use the glue on rivets. Where there is possiblity of impact like in gang ways, I would look at a weld on solution.

Best of both worlds. More expensive where needed and less where not.

_________________
Christopher Chestnut
Free Agent


Offline
 Profile  
 
 Post subject: Re: "Fake" Rivets on Steam Locomotive Tenders
PostPosted: Mon Feb 24, 2020 7:40 pm 

Joined: Sun Oct 15, 2017 7:58 pm
Posts: 172
Howard P.
When BC Rail rebuilt the Royal Hudson, 3716, and CP's 2816 Empress,
They used fake rivets in some area's.

I asked the man who did it, how it was done.

The Photo's are 2816, but it was the same for the two other engines.

They used roundhead carriage bolts, and turned down the shank under the head to round. The threaded portion was slightly smaller than the shank, so the threads would not be damaged during installation.
A hole was drilled in the appropriate place, very close in diameter to the shank, so it required a bit of a push to install it. Using a plastic-faced hammer. A nut and washer was then installed on the inside, and tightened right up. That's how the cab rivets were done.

They also did this on the tender, but added a thin gasket under the rivet head, and then installed the rivet. Again a nut on the inside, well torqued down.

The rows of tender rivets also secure the internal surge-baffles in place, so they are not just cosmetic.
This method has certainly stood the test of time, and used ordinary, off-the-shelf bolts.

They had tried the welding method, but found it unsatisfactory for several reasons.


Attachments:
2816 tender  1.jpg
2816 tender 1.jpg [ 323.23 KiB | Viewed 7982 times ]
2816 tender.jpg
2816 tender.jpg [ 183.39 KiB | Viewed 7982 times ]
Offline
 Profile  
 
 Post subject: Re: "Fake" Rivets on Steam Locomotive Tenders
PostPosted: Mon Feb 24, 2020 9:35 pm 

Joined: Sun Jun 23, 2013 1:16 pm
Posts: 231
Hell, they glue door hinges on vehicles...


Offline
 Profile  
 
 Post subject: Re: "Fake" Rivets on Steam Locomotive Tenders
PostPosted: Mon Feb 24, 2020 11:40 pm 

Joined: Sun Apr 02, 2017 3:13 am
Posts: 134
I suppose turning the square bit off the coach bolt was easier than machining a square hole in the tender side. But how did you hold the bolt when the nut was being tightened up?

I have a love/hate relationship with coach bolts. eg They're used in our carriage seat arm rests and tightening them up when they start slipping in the wood is such a pain.


Offline
 Profile  
 
 Post subject: Re: "Fake" Rivets on Steam Locomotive Tenders
PostPosted: Tue Feb 25, 2020 12:32 am 

Joined: Sat Jan 21, 2017 11:43 am
Posts: 54
kew wrote:
I have a love/hate relationship with coach bolts. eg They're used in our carriage seat arm rests and tightening them up when they start slipping in the wood is such a pain.


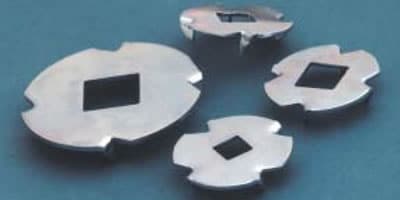
You may find carriage bolt Torque Washers useful. One example:

Image

That photo is from this product spec page: https://www.wclco.com/lock-washers/torq ... age-bolts/


Offline
 Profile  
 
 Post subject: Re: "Fake" Rivets on Steam Locomotive Tenders
PostPosted: Tue Feb 25, 2020 10:27 am 

Joined: Thu Aug 26, 2004 2:50 pm
Posts: 2815
Location: Northern Illinois
kew wrote:
I suppose turning the square bit off the coach bolt was easier than machining a square hole in the tender side. But how did you hold the bolt when the nut was being tightened up?


In the past I've had good luck drilling a somewhat oversize hole and using a tapered square punch, giving it a good wack with a heavy hammer to put four corners in the hole. It takes a bit of experimentation to get the hole size right. This worked well for attaching wood car posts to a structural steel side sheet, 5/16" plate IIRC, but I don't think I'd want to do it on a water tank. The suggestion was to turn the square shank to a diameter that would be an interference fit in the drilled hole, then drive the bolt in.

_________________
Dennis Storzek


Offline
 Profile  
 
 Post subject: Re: "Fake" Rivets on Steam Locomotive Tenders
PostPosted: Tue Feb 25, 2020 11:40 am 

Joined: Wed Mar 01, 2006 4:29 pm
Posts: 84
Location: Monticello, IL
To follow up Russ's comments earlier, yes, Monticello used capacitance discharge welding, used for welding smaller studs to steel surfaces. Strasburg deserves the credit for developing the rivet heads and stud-less application. We bought our first batch of rivets from them. The rivet head has, on the back side, a .005" high stub shank, and in the center of that, a small, say somewhere around 1/32" diameter x a length I don't remember at the moment. (But we found that length is very important.) On the top of the rivet head is a 3/16 nipple about 3/16-1/4" long, which is placed in a collet in the welding gun. This nipple is ground off after the heads are applied. When a rivet is inserted in the gun, the gun and rivet are then pressed firmly against the surface to which it is being welded. The rivet is spring loaded against said surface. When the gun trigger is pulled, the machine discharges a series of capacitors through the rivet to the sheet. The current applied cannot flow through the small pin machined into the stub shank, and the heat generated there creates a molten puddle in the sheet and on the stub shank, and the spring pressure immediately brings the rivet head down onto the molten puddle on the sheet, creating the weld.

On larger diameter rivets, we too had issues with them not bonding well, and discovered the reason was the larger heads had more issues with the capacative energy being lost to arcing at the edge of the rivet head to the sheet, rather than focusing it on the center. This was solved by the very tedious task of placing self-adhesive paper dots over the center pin and stub shank, then spraying a light coating of insulating varnish over the balance of the backside of the rivet head. This stopped the electrical energy leakage, and forced all that energy back to the center, creating secure welds.

The below photos were taken back in 2008, and the only rivet head we have lost since that time was when a scissor lift ran into the tender in the shop, which popped one off. As Russ noted, we stuck a new one one there with a rare earth magnet, and you can't tell where it is, and it is hell to pry it off if you wanted to! All in all, we are satisfied with the look, and we didn't have to drill thousands of holes into something that is supposed to hold water.

Attachment:
File comment: This photo shows a rivet head being applied, with the angle above tack-welded to the tank to provide a reference surface to the top of the gun, and the foot of the gun machined to create the proper rivet-to-rivet pitch.
P1010470.JPG
P1010470.JPG [ 220.11 KiB | Viewed 7784 times ]


Attachments:
File comment: Welding in action. This process actually goes really fast once you get set up, and we also found you could dispense with the angle iron guide, simply using a chalk line for the horizontal reference, wiping off the chalk where a rivet was to be placed.
P1010472.JPG
P1010472.JPG [ 267.8 KiB | Viewed 7784 times ]
Offline
 Profile  
 
 Post subject: Re: "Fake" Rivets on Steam Locomotive Tenders
PostPosted: Tue Feb 25, 2020 12:19 pm 

Joined: Thu Feb 03, 2005 9:32 pm
Posts: 344
IRM Freight dpt. has occasionally replaced rivets lost to welding patches on steel cars. We thread the shanks of rivets. Carefully drill a tight fitting hole. We usually do not have a problem with the rivet spindling. If so holding the head with a channel-lock until it snugs up works. I would not however want to do more than a few dozen. Might be easier to actually do the hot riveting.

Side note on the capacitive rivet head welding. When I worked on Japanese industrial equipment in the 90's I complained about how hard it was to unscrew threaded bolts. A colleague who had been in Japan pointed to the small dimples on the rear surface of the bolt heads. The automatic torque hammers they used were set to spot weld the dimples from friction when applied.


Offline
 Profile  
 
 Post subject: Re: "Fake" Rivets on Steam Locomotive Tenders
PostPosted: Tue Feb 25, 2020 5:37 pm 

Joined: Sun Aug 22, 2004 7:19 am
Posts: 6464
Location: southeastern USA
Are soft iron rivets that don't need heating to be set still available? Ran across these in high school shop too many decades ago....... easy to work.

_________________
“God, the beautiful racket of it all: the sighing and hissing, the rattle and clack of the cars over the rails. These were the sounds that made America the greatest country on earth." Jonathan Evison


Offline
 Profile  
 
 Post subject: Re: "Fake" Rivets on Steam Locomotive Tenders
PostPosted: Wed Feb 26, 2020 2:23 pm 

Joined: Tue Aug 24, 2004 10:34 pm
Posts: 966
Great explanations on stud welding as an option. I never did it myself but when I worked as a welder we used the stud welder using in the .5" range for covers on large hydraulic tanks on our sea going cranes and winches we built for the US Navy and commercial customers. This was in early to mid 1970s. Being new to me I was not real sure how well it worked? But the inspectors for the Navy didn't seem to have a problem with them. A real time and labor saver compared to drilling holes and tapping them to accept a bolt. I often wondered if stud welding was still used or not as I got out of that industry a long time ago. The next technology I got used to was tapered boiler reamer/taps and hot riveting. Seems I stepped backwards eh?

Think the fake rivets from stud welding looks great and if they hold up even more wonderful. I often wondered about the folks that used real rivets to rebuild or build a new tank? So much of this is set up and getting your small crew to all get in line with what ever system you choose. With some good engineering and a "iron worker" I could see cutting the riveting time down to size? Think either way a group chooses to do riveting or fake riveting it is going to be time consuming with the time it takes improving once you get a workable system down.

I have seen some very well done welded tanks with no attempt to use any kind of rivets fake or real. Have also seen a warped and wavy amiture looking tank build that to me would be embarrassing to call my own. I appreciate the effort to make a tank look original, at same time offer no criticism to those who just weld them up. Thanks for taking time with the Stud Welding explanation and pictures. Regards, John.


Offline
 Profile  
 
 Post subject: Re: "Fake" Rivets on Steam Locomotive Tenders
PostPosted: Mon Mar 02, 2020 4:59 pm 

Joined: Tue Sep 14, 2004 7:52 am
Posts: 2477
.


Last edited by Kelly Anderson on Mon Sep 23, 2024 5:22 pm, edited 2 times in total.

Offline
 Profile  
 
 Post subject: Re: "Fake" Rivets on Steam Locomotive Tenders
PostPosted: Mon Mar 02, 2020 7:06 pm 

Joined: Sun Oct 15, 2017 7:58 pm
Posts: 172
Kelly Anderson,
A shot of the tender I took in 1990.
Would this have been the original tender..?
Nice work, BTW.

BC Rail used the imitation rivets, as their shop people were not trained in hot rivets, plus they didn't have the necessary equipment, nor the proper rivet tool.


Attachments:
CRRM Golden Colorado 1990 1.jpg
CRRM Golden Colorado 1990 1.jpg [ 148.98 KiB | Viewed 7246 times ]
Offline
 Profile  
 
Display posts from previous:  Sort by  
Post new topic Reply to topic  [ 27 posts ]  Go to page Previous  1, 2

All times are UTC - 5 hours [ DST ]


You cannot post new topics in this forum
You cannot reply to topics in this forum
You cannot edit your posts in this forum
You cannot delete your posts in this forum
You cannot post attachments in this forum

Search for:
Jump to: